
Running Hello World in a container
Let’s just simply run below code:
|
|
May you don’t know the meaning of code, It’s okay. At the end of this post, you will know what that means naturally. Since I already download image diamol/ch02-hello-diamol, print out like below:
docker container run diamol/ch02-hello-diamol
---------------------
Hello from Chapter 2!
---------------------
My name is:
b56c8d50100a
---------------------
Im running on:
Linux 6.6.16-linuxkit aarch64
---------------------
My address is:
inet addr:172.17.0.2 Bcast:172.17.255.255 Mask:255.255.0.0
---------------------
If you want to run container with any image, you need that image first(if you don’t have, docker download that image which Docker calls pulling (tip) ). This example simply print out message ‘Hello from Chapter 2!’ with details of container running. The image contains all the content for the application, along with instructions telling Docker how to start the application.
- The machine name, in this example: b56c8d50100a
- The Operating system, in this example: Linux 6.6.16-linuxkit aarch64
- The network address, in this example: 172.17.0.2
Though it’s very simple example, we could see the fundamental of docker workflow. build (primary) - share (primary) - run (primary) For the specific descriptions, Someone packages their application to run in a container, and then publishes it so it’s available to other users. Then anyone with access can run the app in a container.
These three concepts are powerful enough to describe how docker works. Because the workflow is the same no matter how complicated the application is. And Docker images can be packaged to run on any computer that supports Docker, which makes the app completely portable—portability (tip) is one of Docker’s key benefits.
tip Try it agin
What if you run exatly same command in terminal? There might me ‘almost’ same output, but sligtly different points are.
docker container run diamol/ch02-hello-diamol
---------------------
Hello from Chapter 2!
---------------------
My name is:
dab89ec979a1
---------------------
Im running on:
Linux 6.6.16-linuxkit aarch64
---------------------
My address is:
inet addr:172.17.0.5 Bcast:172.17.255.255 Mask:255.255.0.0
---------------------
As you can see above, the computer name is ‘dab89ec979a1’ and inet address is ‘172.17.0.5’. The machine name will change every time, and the IP address will often change, but every container is running on the same computer, so where do these different machine names and network addresses come from? We’ll dig into a little theory next to explain that, and then it’s back to the exercises.
What is container?
This is example of application in the container:
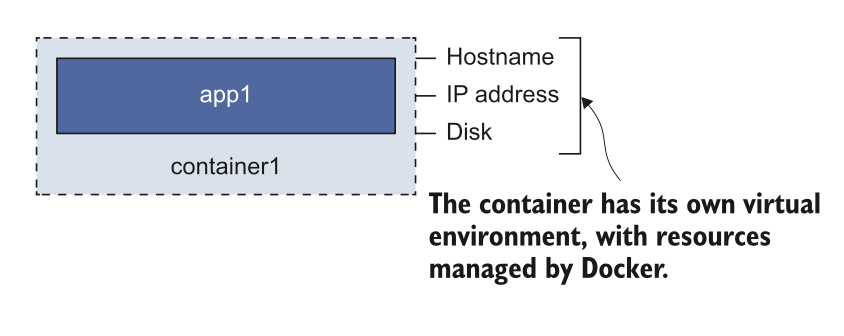
A Docker container is the same idea as a physical container—think of it like a box with an application in it. Inside the box, the application seems to have a computer all to itself: it has its own machine name and IP address, and it also has its own disk drive (Windows containers have their own Windows Registry too). Fig 2.2 shows how the app is boxed by the container.
Those things are all virtual resources—the hostname, IP address, and filesystem are created by Docker. They’re logical objects that are managed by Docker, and they’re all joined together to create an environment where an application can run. That’s the “box” of the container.
The application inside the box can’t see anything outside the box, but the box is running on a computer, and that computer can also be running lots of other boxes. The applications in those boxes have their own separate environments (managed by Docker), but they all share the CPU and memory of the computer, and they all share the computer’s operating system. You can see in Fig 2.3 how containers on the same computer are isolated.
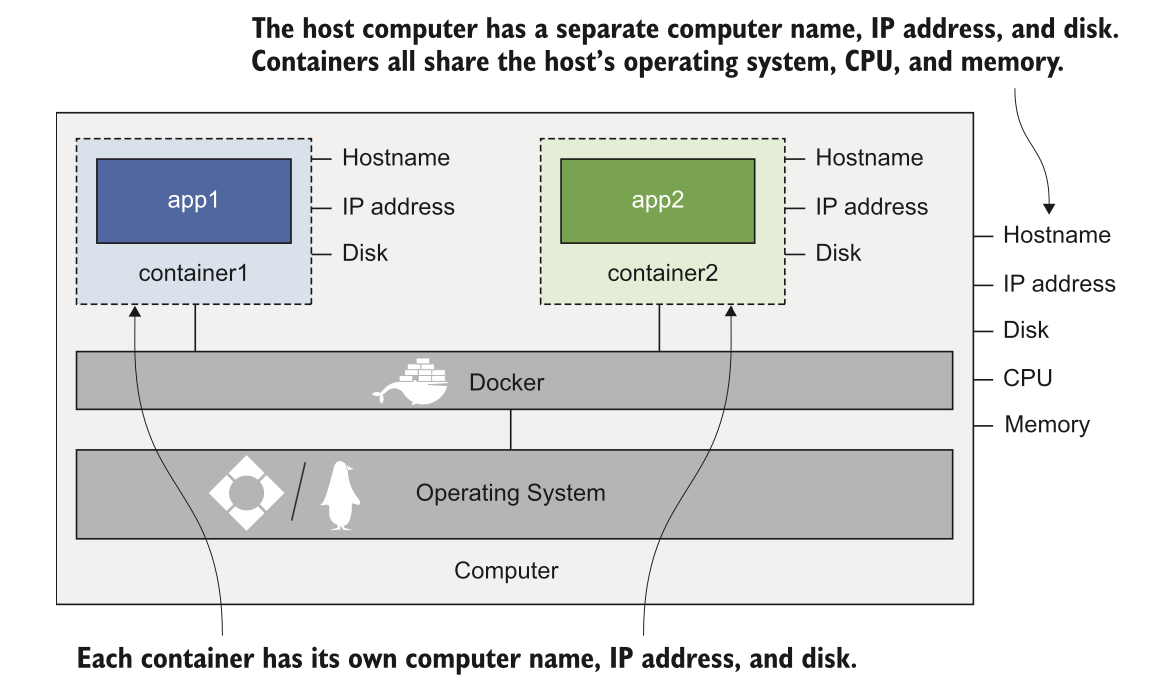
Why is this so important? It fixes two conflicting problems in computing: isolation (tip) and density (tip). Density means running as many applications on your computers as possible, to utilize all the processor and memory that you have. But apps may not work nicely with other apps—they might use different versions of Java or .NET, they may use incompatible versions of tools or libraries, or one might have a heavy workload and starve the others of processing power. Applications really need to be isolated from each other, and that stops you running lots of them on a single computer, so you don’t get density.
The original attempt to fix that problem was to use virtual machines (VMs). Virtual machines are similar in concept to containers, in that they give you a box to run your application in, but the box for a VM needs to contain its own operating system—it doesn’t share the OS of the computer where the VM is running. Compare Fig 2.3, which shows multiple containers, with Fig 2.4, which shows multiple VMs on one computer.
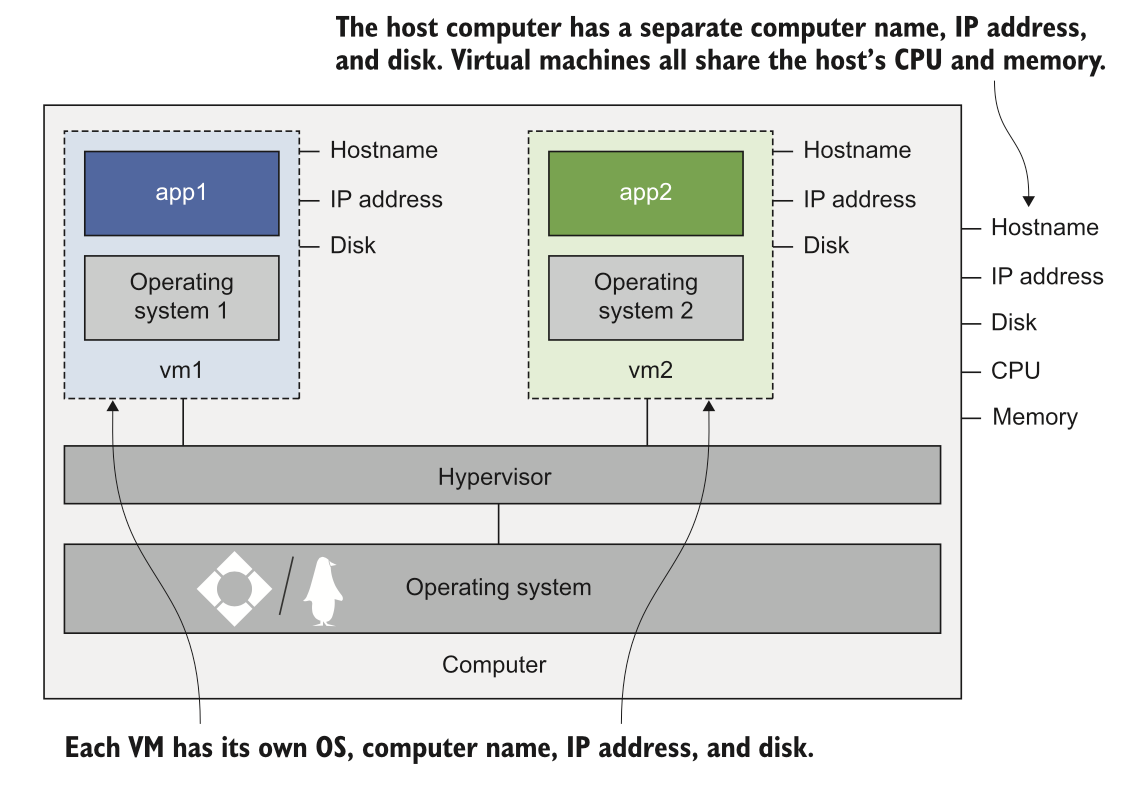
That may look like a small difference in the diagrams, but it has huge implications. Every VM needs its own operating system, and that OS can use gigabytes of memory and lots of CPU time—soaking up compute power that should be available for your applications. There are other concerns too, like licensing costs for the OS and the maintenance burden of installing OS updates. VMs provide isolation at the cost of density.
Containers give you both. Each container shares the operating system of the computer running the container, and that makes them extremely lightweight. Containers start quickly and run lean, so you can run many more containers than VMs on the same hardware—typically five to ten times as many. You get density, but each app is in its own container, so you get isolation too. That’s another key feature of Docker: efficiency.
Now you know how Docker does its magic. In the next exercise we’ll work more closely with containers.
Connecting to a container like a remote computer
You can work with containers in other ways too. Next you’ll see how you can run a container and connect to a terminal inside the container, just as if you were connecting to a remote machine. You use the same docker container run command, but you pass some additional flags to run an interactive container with a connected terminal session.
|
|
The –interactive flag tells Docker you want to set up a connection to the container, and the –tty flag means you want to connect to a terminal session inside the container. The output will show Docker pulling the image, and then you’ll be left with a command prompt. That command prompt is for a terminal session inside the container, as you can see in Fig 2.5.
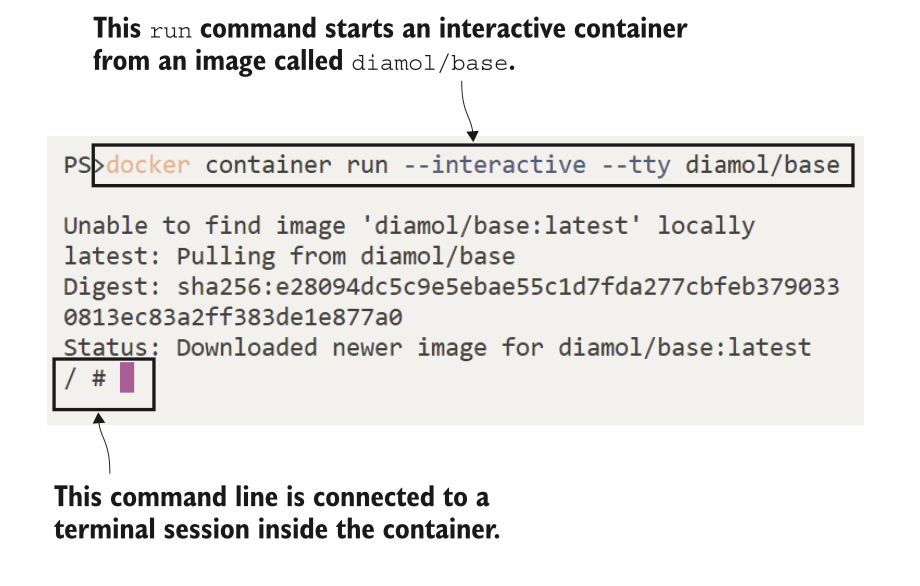
> docker container run --interactive --tty diamol/base
/ # hostname
aa77e539d6b5
/ # date
Mon Apr  8 11:50:30 UTC 2024
Remember that the container is sharing your computer’s operating system, which is why you see a Linux shell if you’re running Linux and a Windows command line if you’re using Windows. Docker itself has the same behavior regardless of which operating system or pro- cessor you’re using. It’s the application inside the container that sees it’s running on an Intel-based Windows machine or an Arm-based Linux one. You manage containers with Docker in the same way, whatever is running inside them.
open a new terminal, and then run command below:
|
|
The output shows you information about each container, including the image it’s using, the container ID, and the command Docker ran inside the container when it started—this is some abbreviated output:
CONTAINER ID   IMAGE         COMMAND     CREATED         STATUS         PORTS     NAMES
aa77e539d6b5   diamol/base   "/bin/sh"   2 minutes ago   Up 2 minutes             eager_franklin
If you have a keen eye, you’ll notice that the container ID is the same as the hostname inside the container. Docker assigns a random ID to each container it creates, and part of that ID is used for the hostname. There are lots of docker container com- mands that you can use to interact with a specific container, which you can identify using the first few characters of the container ID you want.
docker container top lists the processes running in the container. I’m using aa as a short form of the container ID aa77e539d6b5:
|
|
PID     USER    TIME    COMMAND
68423   root    0:00   /bin/sh
If you have multiple processes running in the container, Docker will show them all. That will be the case for Windows containers, which always have several background processes running in addition to the container application.
docker container logs displays any log entries the container has collected:
|
|
docker container inspect shows you all the details of a container:
|
|
The output of these examples is too long to display, so I just skip. Please do yourself.
These are the commands you’ll use all the time when you’re working with containers, when you need to troubleshoot application problems, when you want to check if processes are using lots of CPU, or if you want to see the networking Docker has set up for the container.
There’s another point to these exercises, which is to help you realize that as far as Docker is concerned, containers all look the same. Docker adds a consistent management layer on top of every application. You could have a 10-year-old Java app running in a Linux container, a 15-year-old .NET app running in a Windows container, and a brand-new Go application running on a Raspberry Pi. You’ll use the exactly same commands to manage them—run to start the app, logs to read out the logs, top to see the processes, and inspect to get the details.
You’ve now seen a bit more of what you can do with Docker; we’ll finish with some exercises for a more useful application. You can close the second terminal window you opened (where you ran docker container logs), go back to the first terminal, which is still connected to the container, and run exit to close the terminal session.
Hosting a website in a container
Let’s run code below:
docker container ls
Then you can see nothing, but if you add flag --all (you can use just -a ) you could see like below:
CONTAINER ID   IMAGE          COMMAND       CREATED          STATUS
298ced2b6df0   diamol/base    "/bin/sh"     12 minutes ago   Exited (0) 6 minutes ago
aa77e539d6b5   diamol/base    "/bin/sh"     29 minutes ago   Exited (127) 26 minutes ago
ed93dc4f5285   diamol/base    "/bin/sh"     54 minutes ago   Exited (0) 54 minutes ago
4098ddc5876a   diamol/base    "/bin/sh"     54 minutes ago   Exited (127) 54 minutes ago
Above example is skiped some fileds(PORTS, NAMES).
The containers have the status Exited. There are a couple of key things to understand here.
First, containers are running only while the application inside the container is run- ning. As soon as the application process ends, the container goes into the exited state. Exited containers don’t use any CPU time or memory. The “Hello World” container exited automatically as soon as the script completed. The interactive container we were connected to exited as soon as we exited the terminal application.
Second, containers don’t disappear when they exit. Containers in the exited state still exist, which means you can start them again, check the logs, and copy files to and from the container’s filesystem. You only see running containers with docker container ls, but Docker doesn’t remove exited containers unless you explicitly tell it to do so. Exited containers still take up space on disk because their filesystem is kept on the computer’s disk.
tip What about starting containers that stay in the background and just keep running? That’s actually the main use case for Docker:
Running server applications like websites, batch processes, and databases.
So now, we need to verify background-running functions of docker. Let’s run below code:
|
|
- –detach: Starts the container in the background and shows the container ID
- –publish: Publishes a port from the container to the computer
This time the only output you’ll see is a container ID, and you get returned to your command line. The container is still running in the background. and very next time if you run docker ps, you’ll see:
CONTAINER ID   IMAGE                          COMMAND              CREATED          STATUS
a1b41fa6efa2   diamol/ch02-hello-diamol-web   "httpd-foreground"   20 seconds ago   Up 19 seconds
PORTS                  NAMES
0.0.0.0:8088->80/tcp   confident_wing
When you install Docker, it injects itself into your computer’s networking layer. Traffic coming into your computer can be intercepted by Docker, and then Docker can send that traffic into a container. Containers aren’t exposed to the outside world by default. Each has its own IP address, but that’s an IP address that Docker creates for a network that Docker manages—the container is not attached to the physical network of the computer. Publishing a container port means Docker listens for network traffic on the computer port, and then sends it into the container. In the preceding example, traffic sent to the computer on port 8088 will get sent into the container on port 80—you can see the traffic flow in Fig 2.6.
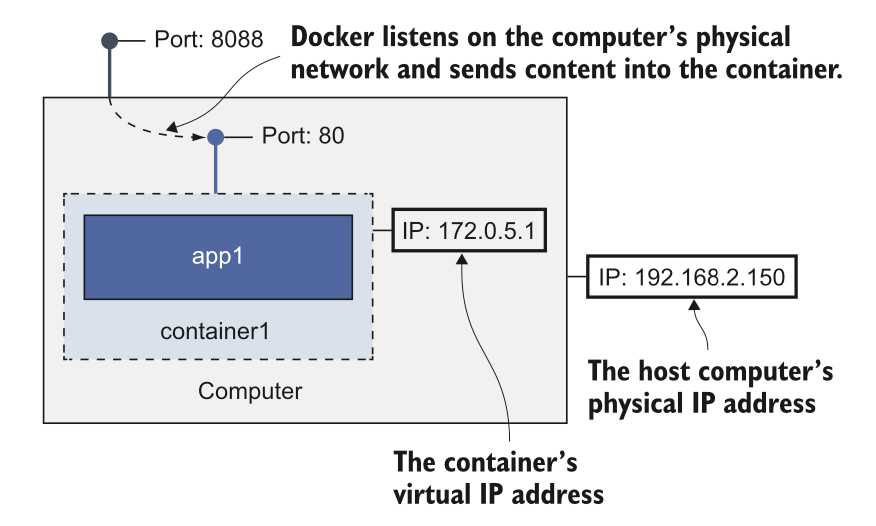
In this example my computer is the machine running Docker, and it has the IP address 192.168.2.150. That’s the IP address for my physical network, and it was assigned by the router when my computer connected. Docker is running a single container on that computer, and the container has the IP address 172.0.5.1. That address is assigned by Docker for a virtual network managed by Docker. No other computers in my network can connect to the container’s IP address, because it only exists in Docker, but they can send traffic into the container, because the port has been published.
By using docker stats short container ID, (in this example, I use docker stats a1b) you can see current status of that container. It shows a live view of how much CPU, memory, network, and disk the container is using.
Also you can use docker container rm --force $(docker ps -a -q) for terminate container.
- rm: designate container ID to terminate that container
- –force: terminate even if it is on running
- $(): sends the output of inside () from one command into another command
So above code meaning like that: Gets a list of all the container IDs on your computer, and removes them all.
This is a good way to tidy up your containers, but use it with caution, because it won’t ask for confirmation.
Understanding how Docker runs containers
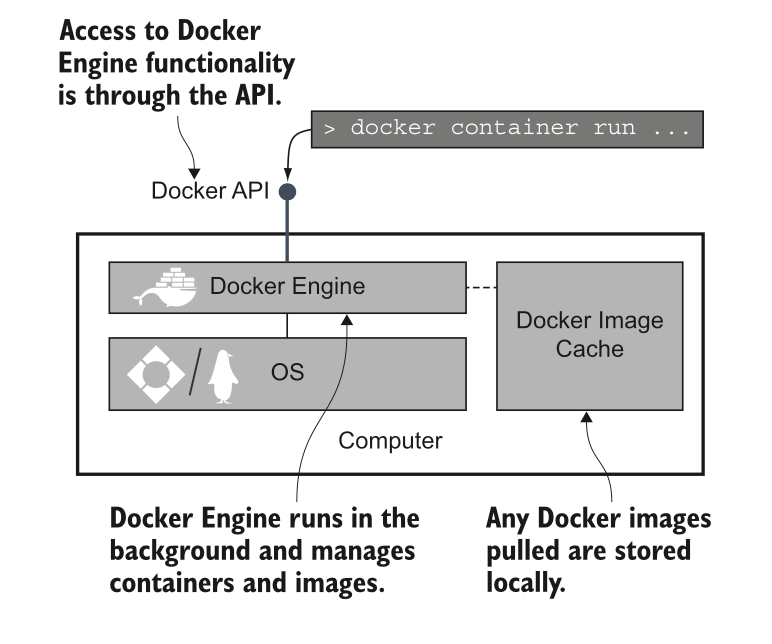
- The Docker Engine is the management component of Docker. It looks after the local image cache, downloading images when you need them, and reusing them if they’re already downloaded. It also works with the operating system to create containers, virtual networks, and all the other Docker resources. The Engine is a background process that is always running (like a Linux daemon or a Windows service).
- The Docker Engine makes all the features available through the Docker API, which is just a standard HTTP-based REST API. You can configure the Engine to make the API accessible only from the local computer (which is the default), or make it available to other computers on your network.
- The Docker command-line interface (CLI) is a client of the Docker API. When you run Docker commands, the CLI actually sends them to the Docker API, and the Docker Engine does the work.
The only way to interact with the Docker Engine is through the API, and there are different options for giving access to the API and securing it. The CLI works by sending requests to the API.
Welecome to the Docker series and I’m gonna study this book, Learn Docker in a Month of Lunches(2020), by own my word.
This series consists of 4 parts:
- Understaning Docker Containers & Images
- Running Distributed Applications in Containers
- Running at Scale with a Container Orchestrator
- Getting Your Containers Ready for Production
This is the first post about series Docker.
In this part, you can get up to speed quickly on the core Docker concepts: containers, images, and registries. you’ll learn how to run applications in containers, package your own applications in containers, and share those applications for other people to use. You’ll also learn about storing data in Docker volumes and how you can run stateful apps in containers. After throughing this chapter, you’ll be comfortable with all the fundamentals of Docker, and you’ll be learning with best pracices baked in from the start.


